How to upgrade Windows 10 from 32 bit up to 64 bit
Windows 10 users have raised lots of different issues with the system for the past year. Nevertheless, more and more users are switching to Windows 10. At the beginning of the summer already a quarter of all computers (Windows, MacOS and UNIX-like systems) were running Windows 10 as it’s operating system.
A free upgrade period that has ended recently guaranteed Microsoft such high volume of updated machines. Any user could upgrade their Windows 7 or Windows 8 computer to Windows 10 for free as soon as they are upgrading within same (or equivalent) product edition (Home, Pro, Enterprise, Education). If a user wanted to update and change Windows edition, it would require payment.
Another thing that that Microsoft allows you to do for free is to switch from 32-bit to 64-bit system.
Why switch to 64-bit?
If you have questioned why you should do that, some time ago we have discussed a difference about 32 and 64 bit operating systems. If you still have not checked it you can click here. Key benefits are that your system can operate with more RAM ( the 32-bit system is not able to recognize more than 3.5GB) and launch 64-bit versions of an application that increases their performance.
Getting started
Unfortunately, you will not be able to switch from 32-bit to 64-bit system with an update from older Windows version to Windows 10. It requires additional workflow, but if take some time and proceeding with an upgrade you will surely get performance benefits.
The first thing you need to do is to check if your hardware supports 64-bit system. Access Start menu and search for System Information. Run tools and check System Type property under System Summary section.
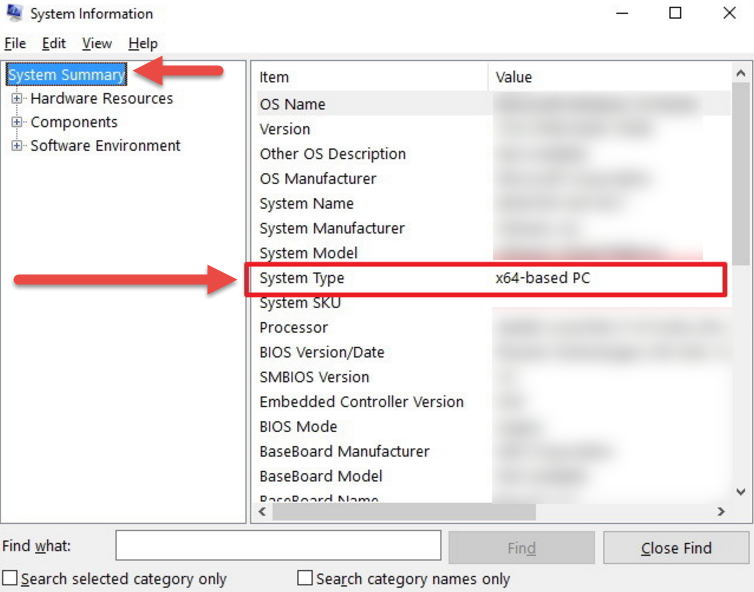
If System Type is indicated as x64-based PC, you can upgrade to 64-bit Windows 10.
For older PCs, you can double check if 64-bit hardware drivers are available.
Backup
Make sure you’ve done a full backup of your system. Go to Start and Launch Control panel. Search for File History. Within File History screen click on System Image Backup. You can save it on the internal or external drive and allow you roll back if anything goes wrong with the further activity.
Also, check if all documents are stored on system drive or simply back them up on cloud or external drive.
Windows 10 clean installation
When you are ready, proceed with clean installation of Windows 10. To do that you will require a USB flash drive with the capacity at least 4 Gb.
Follow the steps described in How to install Windows 10 from the flash drive to create a bootable installation drive.
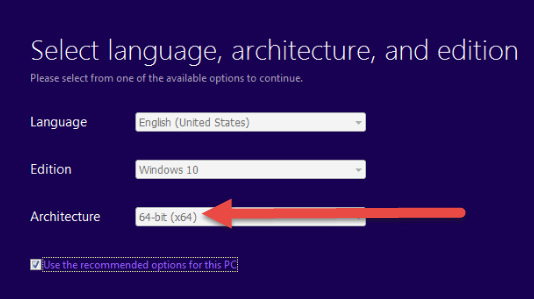
Make sure to choose 64-bit (64x) architecture on the screen shown in the screenshot.
After installation drive is ready, reboot PC with the flash drive plugged in.
Follow the with installation procedure.
When 64-bit Windows 10 installs make sure that you checked for the Windows updates. It is crucial that all drivers have latest versions installed. To do that do to Settings -> Update & Security -> Windows Update.
If you have faced any issues or need any assistance with the process, contact our support representative via chat.
Also, read more Windows-related articles here.
- On August 16, 2016
- 0 Comment

